The Jumble Prism has drawn quite a lot of interest in the community and the recent discussion in the
solving thread inspired me to bust out the ol' Jumble Explorer code and give it a whirl on the surprisingly difficult Jumble Prism. These topics typically count any shape where all grips are in a predefined stop, including shapes where only a single grip is available, but that has always bothered me because you could argue shapes with only a single available grip shouldn't really count as shapes at all. So this time I am only counting shapes that have at least two grips available. I will constantly remind you of this by calling them
essential shapes instead of just shapes. Please enjoy these results
 The Jumble Prism can reach 495 essential shapes!
This number takes into account all symmetries of each shape, including mirror images, which means every pair of
chiral shapes is counted only once. For this first post, all colorings are ignored; we are only looking at shape. The furthest essential shape from solved takes 21 moves to return to the solved shape, and there is only 1 distinct, asymmetric essential shape at this depth (and its enantimorph). Here is the distribution of essential shapes by depth:
0:1
1:2
2:7
3:12
4:18
5:21
6:33
7:25
8:24
9:31
10:65
11:81
12:68
13:46
14:33
15:14
16:6
17:3
18:2
19:1
20:1
21:1
total: 495
If you instead wish to count every chiral pair of shapes twice (once for the right-handed version and once for the left-handed version), the distribution becomes:
0:1
1:4
2:14
3:24
4:36
5:42
6:64
7:49
8:48
9:61
10:128
11:155
12:133
13:89
14:64
15:28
16:12
17:6
18:3
19:2
20:2
21:2
total: 967
By comparing these two lists, you can correctly deduce that there are 23 essential mirror symmetric shapes and 472 pairs of essential chiral shapes. By subtracting the first distribution from the second, you can compute exactly how many pairs of essential chiral shapes occur at each depth. Keep in mind, this list does not include shapes with only 1 grip available whereas I normally do on these topics, but even if I throw them in, the total only climbs to 1,847 (3,671 if you're counting chiral pairs as 2 shapes each). This is not a very big shape space compared to other jumbling puzzles like the Helicopter Cube (14,098) the Geranium (37,730) or the Jumble Trap (553,478) and yet there is a surprising amount of trickiness in the Jumble Prism shape space and it can be quite easy to get lost. My search has revealed why this is the case! This shape space is quite sparse and has TWO extreme chokepoints between large clusters of shapes. This shape space is about as difficult to navigate as possible with this few shapes.

Still, 495 essential shapes is just simply not enough shapes to be lost forever, so wandering deep into the Jumble Prism shape space is not something to fear. Be brave and get lost!
You are statistically nearly guaranteed to eventually stumble back upon solved if you just keep at it for a bit.
Each grip on the Jumble Prism has 5 Stops
The Jumble Prism implements the first of only 2 layers of jumbling present on the Triangular Bipyramid geometry. As shown in my
Jumbling Geometries Catalog, all triangular bipyramid puzzles have the same 5 stops since they are all implemented by the very first jumbling layer:
stop #0: 0°
stop #1: arccos(1/8)≈82.8°
stop #2: arccos(-3/4) ≈138.6°
stop #3: -arccos(-3/4) ≈221.4°
stop #4: -arccos(1/8)≈277.2°
I prefer the grip names I used in my More Madness Shape Space thread, but for everyone's benefit, I will use the same grip names introduced by Konrad in the Jumble Prism solving thread:

(although I am just now realizing as I post this that I actually used the hand-drawn notation but the computer generated color scheme

Sorry, Konrad, I can't win... My colors match the pCubes screenshot in the solving thread, but that is actually upside-down compared to this picture...

)
Shorthand Notation
I noticed some people in the solving thread struggling with my notation. I stand by writing both the starting stop and ending stop as the best way to unambiguously capture the information contained in a jumbling move (and it makes it especially easy to translate into the inverse sequence!). But I do admit that it is verbose. A few people have tried to introduce shorthand notation that is much easier to read and I am open to writing some of the more important sequences in this topic down in shorthand so it can be easier to follow, but I want to caution about the limits of this shorthand.
Most moves on the Jumble Prism are the same rotation angle of ~138.6°. This rotation moves CW from 0->2, 1->3, 2->4, and 3->0. Many conjugates and commutators can be written with only this angle and it is similar enough to 90° that it feels good as a "standard rotation" move. So the shorthand move F can be used in place of F(0->2) and F(3->0), and that covers about 80-85% of all the moves you ever need. However, other rotation angles are possible and sometimes needed, especially if you're going for optimal algorithms. A smaller rotation of ~82.8° appears from time to time, moving CW from 0->1, 2->3, or 4->1. I have seen a plus or minus sign used here to indicate a rotation less than the standard angle we defined above. So F+ can be used in place of F(0->1). So far so good, and probably around 98% of all move sequences can now be written in shorthand.
The problem is there are a few other possible rotation angles left that we haven't covered. If you ever need to move from 1->2 or 3->4, that is a rotation angle of ~55.8°, even smaller than the ~82.8° rotation angle we encountered above. One possible solution here is to define the +/- signs to indicate "a small rotation to the next stop" and this actually works since only one angle or the other is ever possible from a given stop. The only downside is you may notice that the + move you just did felt a bit bigger than the last + move you did, and that's because maybe it was!

The final hiccup is that a wide ~165.6° sweep rotation moving from 4->1 is also possible, and this specifically skips over stop 0. This feels most similar to a standard ~138.6° turn so someone naively trying to notate move on a physical puzzle may mistakenly identify this as a standard move. And this is where the shorthand gets dangerous because a properly sized standard move actually puts you somewhere in between stops 0 and 1 and someone trying to follow the notation might turn a bit less than standard and convince themselves that stop 0 is correct when it really isn't! You may be tempted to call this a "standard turn and a half", so maybe F F+, but it would be more accurate mathematically to write F+ F+ or perhaps F++, since it's literally the smaller ~82.8° rotation applied twice. The good news is, this turn is extremely rare (It did not come up in this post), so by and large we can get away with shorthand notation - just be aware of the possibilities of ambiguity! I will include shorthand notation for the more interesting algorithms in this topic
Number of Piece Locations
There are 4 types of pieces on the Jumble Prism. Only 3 of these piecetypes are visible on the surface, but for my shape space search, I accounted for the internal pieces as well. The number of locations for each piecetype is as follows:
A. Internal Roots - 6 pieces, 30 locations (literally 6 grips×5 stops)
B. Edges - 3 pieces, 33 locations
C. Wide Triangles - 6 pieces, 66 locations (interchangeable with edges, but have orientation, so 33×2)
D. End Caps - 2 pieces, 38 locations
Symmetry Groups
The Jumble Prism can reach shapes that come in 6 different symmetry groups. There is an interesting question of whether it's possible for a nonessential shape to express symmetry. This would require the axis and/or plane of symmetry to intersect the only available grip as otherwise the symmetry itself would imply the existence of multiple free grips. This greatly limits the possibilities for a symmetric nonessential shape, but it is difficult to prove one cannot necessarily exist at a defined stop. In any case, I checked and there are no symmetric nonessential shapes on the Jumble Prism. Therefore with the exception of the final symmetry group, this list is complete for both essential and nonessential shapes. I will give the
Schoenflies Notation name for each symmetry group, as well as try to briefly describe the symmetry for those less familiar with Schoenflies.
1. Symmetry Group D3h (order 12)
Total number of occurrences: 1
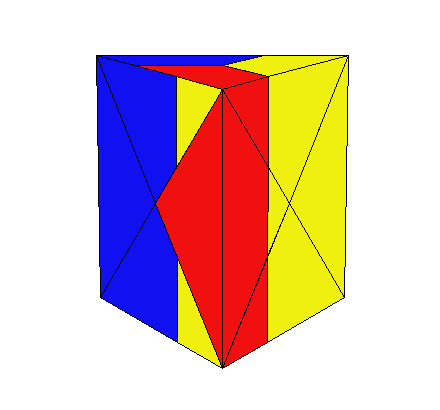
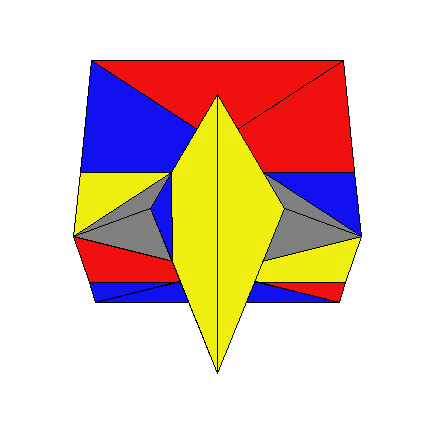
Full Mirror Triangular Bipyramid symmetry: Only the solved shape expresses this symmetry. My simple simulator can't handle the curved stickers of the mass produced Jumble Prism, so I used the sticker design from the original Jumble Prism prototype instead (updated to the mass-produced colors). I hope they are similar enough
 2. Symmetry Group C2v (order 4)
Total number of occurrences: 2
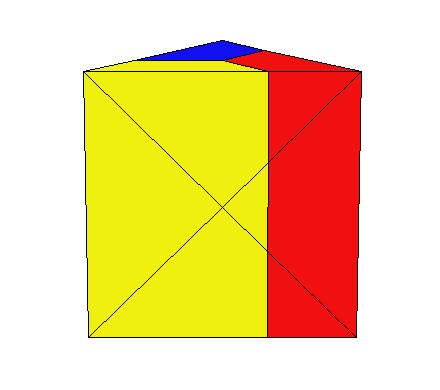
The 'C' stands for cyclic. C2 indicates that this symmetry class can be rotated about some axis by 180°. The 'v' stands for vertical and indicates that in addition to the rotational symmetry, this group exhibits mirror symmetry as well and specifically that mirror is coincident with the rotation axis (which is always set to vertical for consistency). Both shapes that express this symmetry in the Jumble Prism Shape Space are very interesting, so I want to give them each a chance in the spotlight.
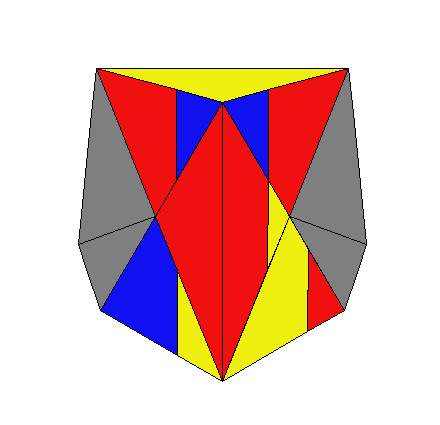
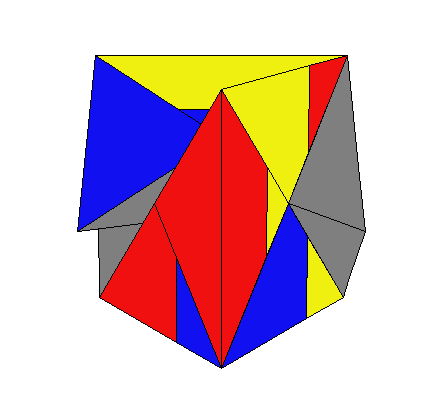
The first C2v shape in the Jumble Prism shape space occurs at 11 moves from solved. This confusing shape appears to be perfectly solved except an for an edge that has apparently twisted 90°. However, such a 90° twist is not supported by the mechanism at all, and indeed the reality is that the protruding edge is the only piece in the correct place! Every other piece has been reassembled into what appears to be the solved shape but twisted 90° relative to the core. Although it takes on a different look for this puzzle, this shape is objectively analogous to the original jumbling wonder of the Helicopter Cube Meson Shape! This is one of the best secrets waiting to be discovered in the Jumble Prism Shape Space

B(0->2), R(0->2), F(0->3), R(2->0), F(3->0),
B(2->0), R(0->3), BL(0->1), BR(0->2), BL(1->3),
L(0->2)
Shorthand:
B R F' R' F B' R' BL+ BR BL L
which can be condensed into [B:[R,F']] R' BL+ BR BL L
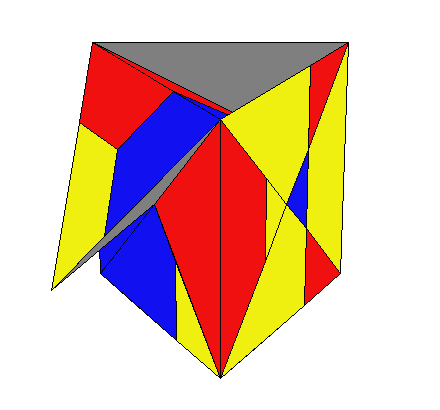
The only other example of this symmetry is also the deepest symmetry in the Jumble Prism. This is the only time (so far) I have discovered that the deepest symmetry in a shape space is actually MORE symmetric than the second deepest. It occurs 18 moves deep and is in fact along the same branch as the deepest shape possible. The deepest shape is just 4 moves beyond this shape (4 instead of 3 because one move can be saved by skipping over this shape).
L(0->2), BR(0->2), BL(0->3), BR(2->0), BL(3->0),
L(2->0), BR(0->3), F(0->1), R(0->4), F(1->3),
R(4->2), F(3->0), BR(3->0), R(2->0), L(0->3),
BL(0->2), L(3->0), BL(2->0)
Shorthand:
L BR BL' BR' BL L' BR' F+ R- F R' F BR R' L' BL L BL'
which can be further condensed to [L:[BR,BL']] BR' F+ R- F R' F BR R' [L',BL]
The path to both of these shapes are highlighted in red on the shape space map below!
3. Symmetry Group C2 (order 2)
Total number of occurrences: 5
*Chiral
Just like the previous group, this symmetry group can rotate it 180° but it is NOT mirror symmetric. There are exactly 5 shapes that express this symmetry and they occur at depths 2, 6, 8, 11, and 16:
1.L(0->2), BR(0->2)
2.L(0->3), F(0->2), L(3->0), F(2->0), B(0->3), F(0->3)
3.L(0->2), R(0->3), L(2->0), BL(0->3), R(3->0), BR(0->2), BL(3->0), L(0->2)
4.B(0->3), L(0->3), F(0->2), L(3->0), F(2->0), B(3->0), L(0->2), BR(0->4), BL(0->3), BR(4->2),
BL(3->0)
5.F(0->3), BR(0->3), B(0->2), BR(3->0), B(2->0), F(3->0), BR(0->2), L(0->4), R(0->3), L(4->0),
BL(0->3), BR(2->0), L(0->2), R(3->0), BR(0->2), BL(3->0)
All 5 of these shapes are highlighted in yellow on the shape space map below!
4. Symmetry Group Cs vertical (order 2)
Total number of occurrences: 10
Cs is Schoenflies Notation for mirror symmetry across a plane. I have added the word "vertical" to distinguish it from the next symmetry group since this group refers to mirror symmetry across a vertical plane. The 10 shapes that express this symmetry are located at depths 6, 7, 10, three at 11, 12, 13, and two at 14:
1.L(0->2), R(0->3), L(2->0), R(3->0), BR(0->2), BL(0->3)
2.L(0->2), R(0->2), BR(0->3), R(2->0), BR(3->2), L(2->0), BL(0->3)
3.F(0->3), BR(0->3), B(0->2), BR(3->0), B(2->0), F(3->0), BR(0->2), L(0->2), BL(0->3), L(2->0)
4.F(0->3), R(0->2), F(3->1), R(2->0), F(1->0), BR(0->2), L(0->2), BL(0->3), BR(2->0), BL(3->0),
L(2->0)
5.BR(0->3), B(0->2), BR(3->1), B(2->0), BR(1->0), F(0->2), L(0->3), F(2->0), L(3->0), BR(0->2),
BL(0->3)
6.F(0->3), R(0->2), F(3->1), R(2->0), F(1->0), BR(0->2), L(0->2), BL(0->3), L(2->0), BL(3->1),
BR(2->4)
7.B(0->2), BR(0->3), B(2->4), BR(3->0), B(4->0), R(0->3), L(0->3), BL(0->3), L(3->0), R(3->2),
BR(0->2), R(2->0)
8.F(0->2), L(0->3), F(2->4), L(3->0), F(4->0), BL(0->3), R(0->3), BR(0->2), L(0->3), BL(3->0),
L(3->0), R(3->0), BL(0->3)
9.F(0->2), BL(0->2), B(0->3), BL(2->0), B(3->0), F(2->0), BL(0->3), R(0->3), BR(0->2), L(0->2),
R(3->0), L(2->0), BL(3->1), BR(2->4)
10.F(0->3), R(0->2), F(3->1), R(2->0), F(1->0), BR(0->2), L(0->4), R(0->3), L(4->3), BL(0->3),
L(3->0), R(3->0), L(0->2), R(0->3)
All 10 of these shapes are highlighted in green on the shape space map below!
5. Symmetry Group Cs horizontal (order 2)
Total number of occurrences: 10
This symmetry group also expresses mirror symmetry across a plane, but this time the plane is horizontal. The 10 shapes that express this symmetry are located at depths 6, 9, 10, three at 11, two at 12, and two more at 13:
1.BL(0->3), L(0->2), R(0->2), BR(0->3), R(2->0), BR(3->0)
2.F(0->2), L(0->3), F(2->4), L(3->0), F(4->0), B(0->3), F(0->2), L(0->2), BL(0->3)
3.F(0->3), R(0->2), F(3->1), R(2->0), F(1->0), BR(0->2), L(0->2), BL(0->1), BR(2->0), BL(1->3)
4.L(0->2), R(0->3), L(2->4), R(3->0), L(4->0), BR(0->3), B(0->2), BR(3->0), B(2->0), L(0->2),
BL(0->3)
5.R(0->3), L(0->2), R(3->1), L(2->0), R(1->0), BL(0->2), F(0->2), B(0->3), BL(2->0), L(0->2),
BL(0->3)
6.F(0->3), R(0->2), F(3->1), R(2->0), F(1->0), BR(0->2), L(0->2), BR(2->0), R(0->3), BL(0->3),
R(3->0)
7.F(0->2), BL(0->2), B(0->3), BL(2->0), B(3->0), F(2->0), BL(0->3), R(0->1), L(0->4), R(1->3),
L(4->2), R(3->0)
8.R(0->2), F(0->3), R(2->4), F(3->0), R(4->0), B(0->3), BL(0->4), B(3->0), BL(4->2), L(0->3),
BL(2->0), L(3->0)
9.F(0->3), BR(0->3), B(0->2), BR(3->0), B(2->0), F(3->0), BR(0->2), L(0->4), R(0->1), L(4->2),
R(1->0), BL(0->3), BR(2->0)
10.L(0->3), F(0->2), L(3->1), F(2->0), L(1->0), B(0->2), BR(0->3), B(2->0), BR(3->0), BL(0->3),
BR(0->2), BL(3->0), BR(2->0)
All 10 of these shapes are highlighted in blue on the shape space map below!
5. Symmetry Group C1 (order 1)
Total number of occurrences: 467
*Chiral
And the "Everything-Else" group. This group represents all shapes that have no symmetry, the Asymmetry group. Keep in mind these 467 shapes are only the essential asymmetric shapes. All 1352 nonessential shapes my program found would also belong to this group had I included them. The depths of the asymmetric shapes range from the very first move all the way down to this shape at the very bottom of the essential shape space, 21 moves away from the solved shape:
BL(0->3), R(0->3), L(0->2), R(3->0), L(2->0), BL(3->0), R(0->2), B(0->4), BR(0->1), B(4->2),
BR(1->3), B(2->0), R(2->0), BR(3->0), BL(0->2), L(0->3), BL(2->0), L(3->2), R(0->2), BR(0->3),
R(2->0)
Shorthand:
BL' R' L R L' BL R B- BR+ B' BR B' R' BR BL L' BL' L- R BR' R'
which can be further condensed to [BL':[R',L]] R B- BR+ B' BR B' R' BR [BL:L'] L- [R:BR']
*Notice the first 17 moves are just the mirror image through the horizontal plane of the first 17 moves of the second C2v symmetry above!*
Bram's Legendary Shape
In the solving thread, Bram shared this story with us
Bram wrote: ↑Sat Feb 13, 2021 6:33 pm
At the risk of starting a legend here's a story and a question.
Many years ago, back when dinosaurs walked the earth and 3d printing was still a new thing, I got to play with an early unstickered prototype of this puzzle. It wasn't *exactly* the same thing, in that the shape was slightly different so it's possible that which moves were blocked was slightly different, but I don't think so. The thing I found playing with it was that once in a great while it would get into a jumbled state where it seemed like one of the two equilateral triangle pieces was swapped with a piece immediately next to it. This was extremely rare of a state to get into and equally hard to get back out of. Does anybody know a move sequence for getting into/out of this state?
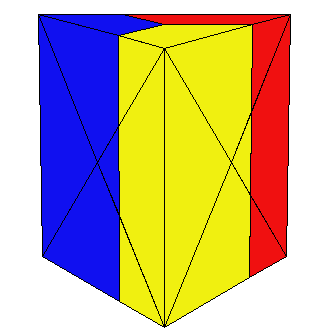
This shape is indeed possible and in fact has already been mentioned in this post! This shape expresses Cs (vertical) symmetry and is actually the 4th shape in the 4th symmetry class described above. Swapping a wide triangle and an end cap piece produces this tooth shape that is not unlike the tooth shapes that appear on a Helicopter Cube when a corner is swapped with a triangle. Except on the Helicopter Cube, these teeth always come in pairs, so it might be quite surprising that it's possible to create just a single tooth on the Jumble Prism. It's too late to stop the legend, Bram, but at least the Legend of the Single Tooth is a true story! This shape can be reached optimally in 11 moves:
F(0->3), R(0->2), F(3->1), R(2->0), F(1->0),
BR(0->2), L(0->2), BL(0->3), BR(2->0), BL(3->0),
L(2->0)
Shorthand:
F' R F' R' F- BR L BL' BR' BL L'
which can be further condensed to F' [R:F'] F- BR [L:[BL':BR']]
As for whether or not this shape should truly be considered difficult to stumble upon and get back out of again, let's take a look at the full Shape Space pictured below, where the path to this shape is highlighted in green!
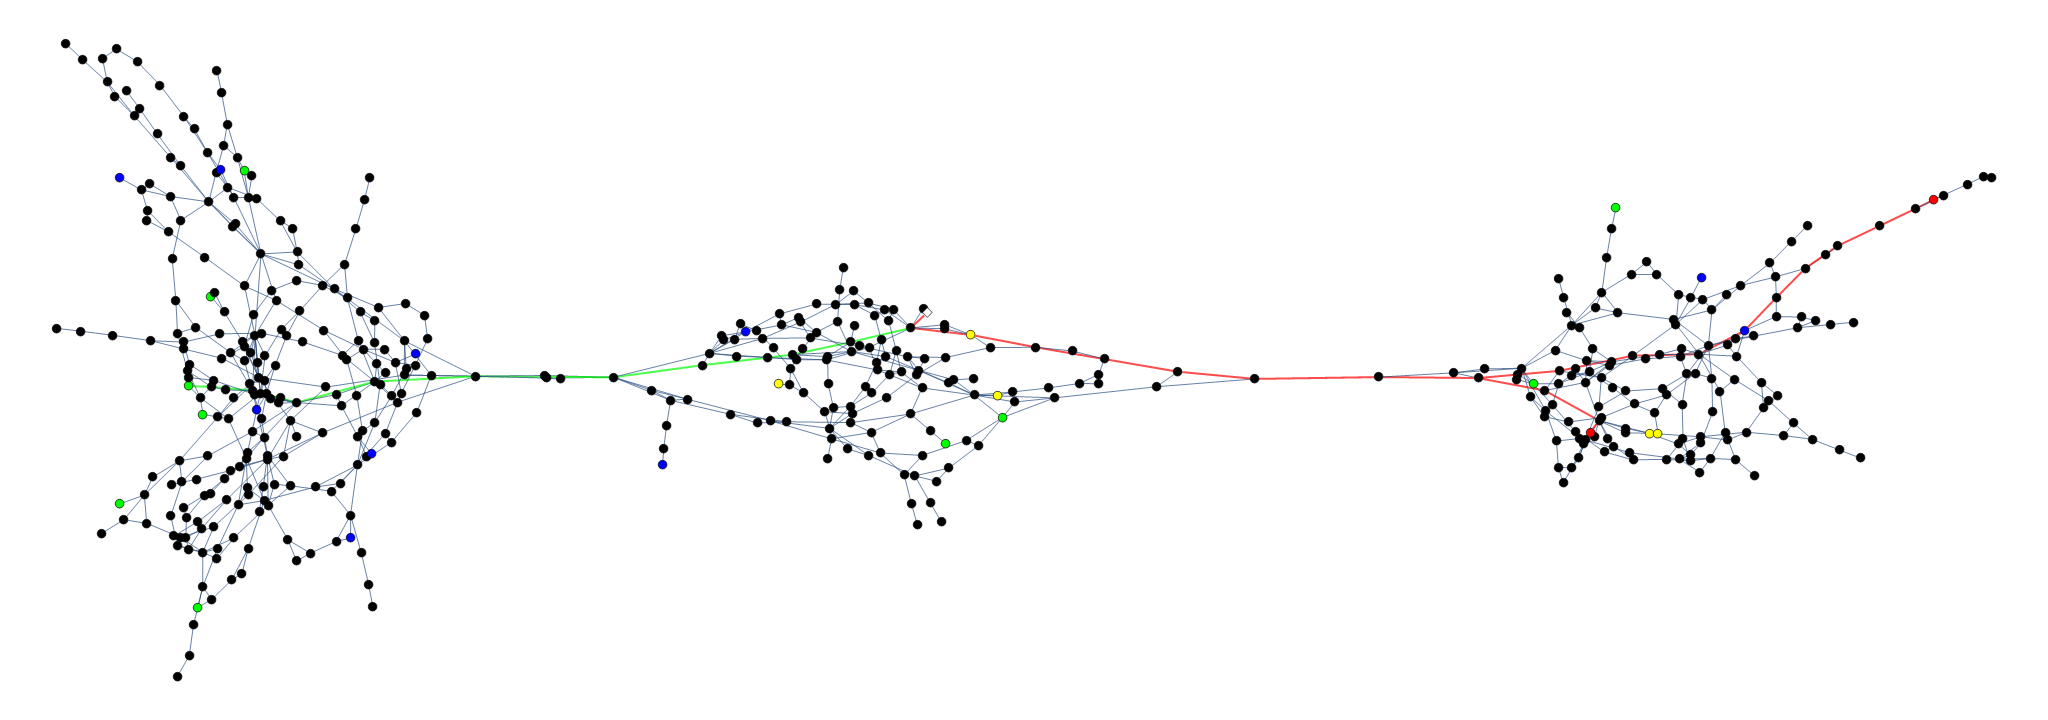
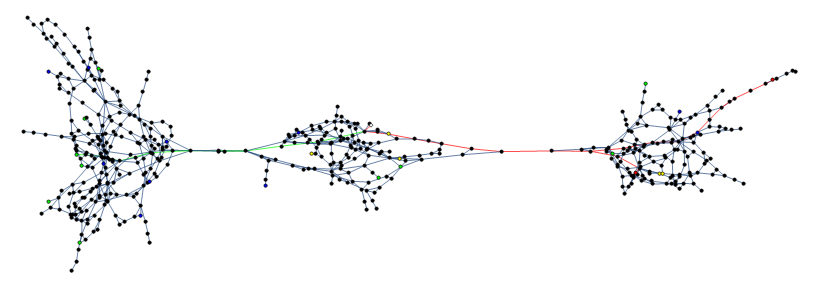
 Jumble Prism Essential Shape Space
495 shapes is definitely small enough to graph, so let me now present the Jumble Prism Essential Shape Space in its full glory:
 (click the image for a slightly bigger version!)
The Jumble Prism Shape Space is
beautifully organized into 3 nearly equal clusters with only a single move chokepoint separating each cluster from the next! The solved shape is in the center cluster, Bram's Legendary Shape is in the left cluster, and both the Meson shape as well as the deepest shape are in the right cluster. I therefore propose the clusters be named from left to right: Legend, Solved, and Deep clusters. Or LSD for short

- The solved shape is the white diamond in the Center cluster.
- The 2 C2v shapes (the Meson Shape and the Deepest Symmetry) and the paths to them are both shown in red (the Meson Shape is the shorter path).
- The path to Bram's Legendary Shape is shown in green.
- The 5 C2 shapes are marked in yellow (3 in the Solved cluster, 2 in the Deep cluster).
- The 10 Cs vertical shapes (including the Legendary Shape) are marked in green (6 in the Legend cluster, 2 in the Solved cluster, 2 in the Deep cluster).
- The 10 Cs horizontal shapes are marked in blue (also 6 in the Legend cluster, 2 in the Solved cluster, 2 in the Deep cluster).
- The deepest shape is not marked in a special color, but easily identifiable as the rightmost node in the map.
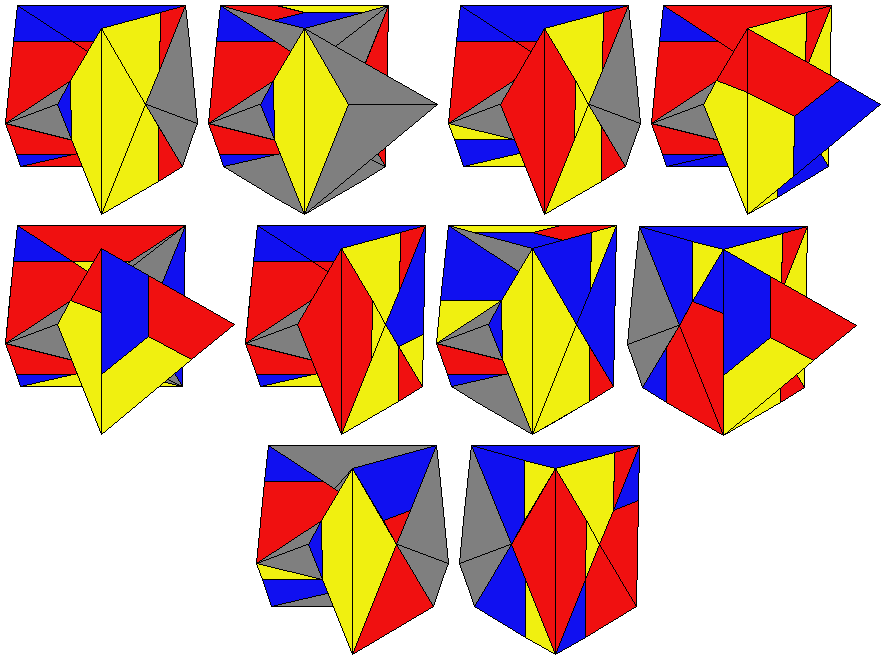
Keep in mind only shapes with at least 2 free grips are pictured if you are trying to follow along. The nonessential shapes are all exactly 1 move away from some node in this map, so they don't add any structure (hence the name nonessential!)
Jumble Prism Shape Space Clusters
The fact that the Jumble Prism Shape Space divides so cleanly into 3 distinct clusters was another surprise waiting to be discovered about this puzzle. Both bridges between cluster consist of only a single bridge between 2 specific shapes, so these are as restricted of choke points as you can ever have! The existence of these chokepoints is what makes wandering around the Jumble Prism Shape Space so unexpectedly challenging sometimes and also why subsequent jumbling expeditions can feel like totally different spaces. Even if you feel like you have given the Jumble Prism a thorough scramble, you may have been stuck in only one cluster the whole time! And even if you DO find yourself in the Legend or Deep clusters, there's a decent chance your solution will never visit the other non-Solved cluster. I want to briefly look at each cluster.
Solved Cluster
The Solved cluster contains only 124 essential shapes, making it the smallest of the 3 clusters. In addition to containing the most symmetric shape (solved), it also contains 3 of the 5 C2 shapes, so another name for it could be the Spiral cluster (C2 symmetry often being demonstrated by a spiral). 2 examples of each simple mirror symmetry can also be found here, but neither of the C2v shapes live in the Solved Cluster
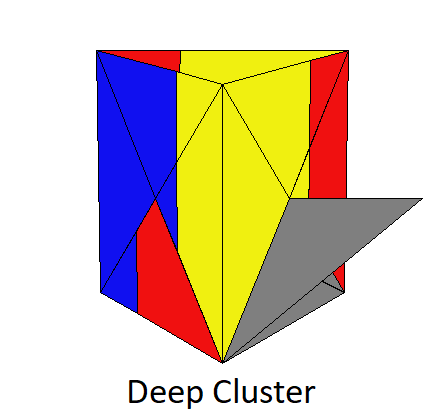
Deep Cluster
The Deep cluster is a bit cleaner, so let's discuss it next. The entrance to the Deep cluster lies 7 moves away from solved and contains 142 essential shapes. I made this gif to demonstrate the path into the Deep cluster:
R(0->2), B(0->2), BR(0->3), B(2->0), BR(3->0), R(2->0), B(0->3)
Shorthand:
R B BR' B' BR R' B'
which can be further condensed to [R:[B,BR']] B'
The final move of this sequence crosses the bridge from the Solved cluster into the Deep cluster. From here, grip L is available, and the journey into the Deep cluster begin with either L+ which frees up F, or L', which frees up BL. The deep cluster has exactly 2 copies of each symmetry group except for solved: The Meson Shape and the Deepest Symmetry (the only 2 C2v shapes), the remaining 2 C2 shapes, as well as 2 shapes from each Cs group can all be found in this cluster. Finally, this cluster contains the deepest shape in the entire space, giving it its name
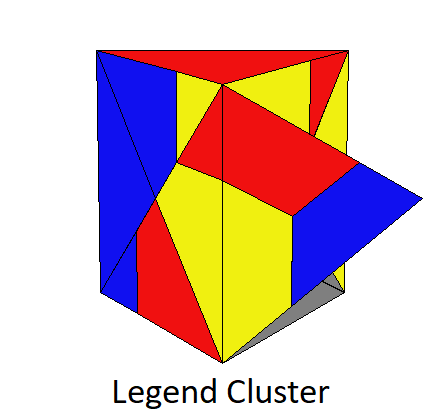
Legend Cluster
The bridge to the Legend cluster is not quite as clean cut as its Deep counterpart. There is still a single move connecting the Legend cluster to the Solved Cluster, but the grip that gives this move can stop at 2 other stops, leading almost immediately to dead-ends and resulting in 3 essential shapes that are orphaned somewhere in between the Legend and Solved clusters. Excluding those 3 shapes, the Legend cluster contains 226 shapes, making it the largest of the 3 clusters by about 59%. The entrance to the Legend cluster lies only 6 moves away from solved and I have again made a gif to demonstrate the path into the Legend cluster:
R(0->2), F(0->3), R(2->4), F(3->0), R(4->0), B(0->3)
Shorthand:
R F' R F R+ B'
which can be further condensed to R [F':R] R+ B'
The final move of this sequence crosses the bridge from the Solved cluster into the Legend cluster. From here, a ton of moves are available to lead you into the Legend cluster:
- L+ frees up F
- L' frees up F, B, and BL
- BL frees up L and B
- BL' frees up L
- BL- frees up B
I think it could be argued that this gathering of free grips right at the chokepoint makes the Legend cluster harder to escape than any other cluster. Even if you do wander your way to this chokepoint shape, you have to choose the correct grip of the 3 available to cross the bridge back to the Solved cluster. The other 2 grips both lead you back into the Legend cluster. Another potential name for the Legend cluster could be the Mirror cluster, because this cluster contains 60% of both types of Cs symmetry groups, triple the density of Cs shapes of any other cluster. Hey, it was a tough call between Legend and Mirror - in the end I gave the honor to Bram, but you can call it what you like. There is a certain ominousness to "entering the Mirror cluster"

Those 3 orphaned shapes that lie somewhere between the Solved and Legend clusters can be reached by replacing the final B' in the Legend chokepoint sequence above with B+ or B BR. The former frees up BL and the latter frees up R, but in both cases no stops free up any additional grips so you are forced to undo moves.
Finally, I have attached an Excel spreadsheet to this post that breaks down the instances of each symmetry group by depth as well as some statistics on the number of blocked grips throughout the shape space. There isn't too much to talk about regarding blocked grips on this puzzle. I didn't track shapes with only 1 free grip, so you won't see any in the excel document. I suppose it's also worth mentioning that there are no shapes that block only 1 grip, though this is a far from unique property for jumbling puzzles. The full list is in the excel document if anyone would like to see!
Hopefully you have enjoyed this thread so far but we aren't done! The shape space of the Jumble Prism is small enough that I can explore deep into the
State Space, where I
DO account for the stickers quite quickly. This valuable tool allows me to fully analyze the impact all of these jumbling moves have on the possible configurations of the Jumble Prism! But let's make a new post for that discussion, because this one is getting a bit lengthy
-Matt Galla