 This
is the situation our cube is now in. Remember how we made a cross at the
bottom? Well, now we are going to make a cross at the top. This
is the situation our cube is now in. Remember how we made a cross at the
bottom? Well, now we are going to make a cross at the top.
|
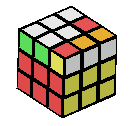
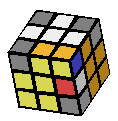
 First
let's turn off all the corner colours for a second and focus our attention
on the edges. You'll notice two of the edges are correcly facing up like
the white centre, and two edges are incorrectly facing out. First
let's turn off all the corner colours for a second and focus our attention
on the edges. You'll notice two of the edges are correcly facing up like
the white centre, and two edges are incorrectly facing out.
|
|
There are four possibilities when doing the cube at this stage:
- All four are correct (a cross)
- All are incorrect
- Two are correct next to each other
- Two are correct opposite each other
In our situation, two are correct next to each other. We'll go through the move slowly to fix our cross.
|
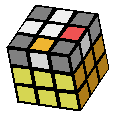
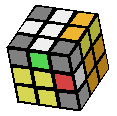
 First, turn the orange face once anti-clockwise. First, turn the orange face once anti-clockwise. |
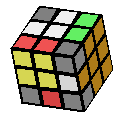 Turn the yellow face once clockwise. Turn the yellow face once clockwise. |
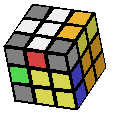
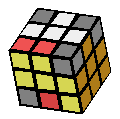 Turn the orange face once clockwise. At this point, you'll notice that one of
the two edge cubes has been corrected. Again, on the left of this diagram,
the yellow and blue edge cube needs to go back to the bottom... Turn the orange face once clockwise. At this point, you'll notice that one of
the two edge cubes has been corrected. Again, on the left of this diagram,
the yellow and blue edge cube needs to go back to the bottom... |
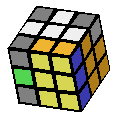
 A
single anti-clockwise turn of the yellow face will fix that. Except now,
the orange and yellow pair has popped out of it's hole. To put it back
in... A
single anti-clockwise turn of the yellow face will fix that. Except now,
the orange and yellow pair has popped out of it's hole. To put it back
in... |
 Turn the white face anti-clockwise once. Turn the white face anti-clockwise once. |
 Turn the yellow face anti-clockwise once to line up with the pair. Turn the yellow face anti-clockwise once to line up with the pair.
(Thank you to Mick Petzold and Tony S for picking up this error) |
 Turn the white face clockwise once to bring them all together. Turn the white face clockwise once to bring them all together. |
 And finally, turn the yellow face once clockwise. Now we have a cross. And finally, turn the yellow face once clockwise. Now we have a cross.
You might also notice that the actual edge pieces that make up that cross are out of order. That's not really all that important yet. We'll fix that right at the end.
|
| For the rest of the steps, we are going to use notation. If we did the above step with notation rather than step by step pictures, it would be written as:
R-1
F R F-1 U-1
F-1 U F
In words, this simply means:
- right once anti-clockwise
- front once clockwise
- right once clockwise
- front once anti-clockwise
- top once anti-clockwise
- front once anti-clockwise
- top once clockwise
- front once clockwise
|
Diagram key: Thanks to a suggestion by Fabio d'Alambert, who felt that it was difficult to understand the orientation of the diagrams. They are viewed from the top of the cube, as if you were flying over it. The sides are marked below:
|
| |
|
|
|
|
Double edge flip (adjacent)
R-1
F R F-1 U-1
F-1 U F |
Double edge flip (opposite)
F-1 L-1
U-1 L U
F |
Double Edge Swap
R-1
F R F-1 U-1
F-1 U L-1
U-1 L U
F |
|

